Rod Puppet Construction Masterclass: Reflection Journal
by fingerplayers
This year’s Rod Puppet Construction Masterclass was conducted by TFP Co-Founder Ong Kian Sin, from 2 – 6 Aug 2021, at The Finger Players Workshop.
This journal entry is penned by Joanne Ng, a theatre-maker and workshop participant. This documentation is intended to be an open resource to share insights to the process of puppet-making through the perspective of a theatre performer.
We would love to hear your thoughts, and can be reached at admin@fingerplayers.com.

DAY 1
We started our journey together in the rehearsal studio, which incidentally I thought was very apt indeed. I’m sure the majority of artists will agree that it has been far too long since we could sit together in a circle, sharing our thoughts and our learning intentions. And in doing so, setting the tone for my puppetry journey.
Already in the studio, were a couple of puppets waiting for us. The TFP team had prepared puppets varying in size, weight and design for us to work with. They looked quite easy to work with, or so I thought. First, there’s the rod stuck to the puppet’s head that you have to be in constant control of. Letting go would result in a limp, lifeless puppet, or neglect to give your puppet an eyeline. Then, there were the arms to think about. Each attached to a rod which I constantly forgot while supporting the puppet from a hook at the back of its spine. And with the very same hand that supports the spine, I had to move its legs and remember that the puppet must “breathe”. Crazy. It was absolutely crazy! I’ve watched a number of performances by The Finger Players and I think I owe it to them now to say that they made everything seem so effortless.
But despite the madness my mind, body and particularly, hands, had to endure in the first 15 minutes of this Masterclass, I was addicted to this intense connection between myself and the puppet I was working with.
Technical Drawings


We next moved on to the workshop. This was where things started to get serious. Technical drawings are the very beginnings for rod puppet construction. To understand what you are about to build, you have to be able to put it all on paper first. Following the examples provided by our trainer Kian Sin, we would start the course with sketching out our puppet on paper with detailed measurements of the head, hands, arms, legs, body, you name it. And it was also at that point he began asking more questions about our puppet, which was going to be a representation of “our other self”. A simple question from Kian Sin threw me deep into thought. “Why?” he asked and I already found myself stumbling to answer. Seeing that I wasn’t entirely sure or confident in my initial design, he asked me to “give it some thought” and assured me that ideas may change or get stronger as I go along. Especially once we took the 2D technical drawings to the next level.
Carving the head
Leaving the technical drawings behind as a guide, we moved into first sketching the face of the puppet onto a large block of styrofoam. Sounds easy right? I thought I aced this. But that’s just the start. We were then instructed to start carving the head.


This step took the longest for me to accomplish. I faced a road block, literally. I couldn’t fathom how to cut, shape or carve a face into the styrofoam. What I realised was, I couldn’t let go. Scared but determined to push forward, I took little steps, carving slowly, cutting away at the edge, but always staying at the edge. Of course, this was quickly spotted by Kian Sin who shared, “Let the materials guide you Joanne. Let go.” And so I did. I let go. And, like the typical Singaporean student I was, I sneaked many peeks at how my other coursemates were handling their blocks, and, saw them having little to no trouble at all, unlike me, I pushed forward and hacked away eventually. The interesting thing about sanding away at a piece of styrofoam is that it can get quite therapeutic. I marvelled at the way the foam surrendered itself and steadily felt a connection to this face that gradually revealed herself.

The day ended with us applying the first layer of papier maché to the foam. A seemingly straightforward task, yes? No! Air pockets, bubbles and folds. It was all about covering all the areas and making sure that the layer was as smooth as it could be. Perhaps, lucky for me, my puppet was an old lady. My not-so-great papier maché skills could pass off as well-designed wrinkles instead of a result of untidiness or not pressing hard enough to remove air pockets.
The most important thing I need to point out here is, while working on the puppet, and making sure that it suited me and responded to me, the puppeteer, I gradually formed a relationship with the materials. The materials that, in good time, would become my puppet, my other self.
DAY 2
The head – Inserting of the rod


Day 2 started off with us adding a layer of papier maché again to the head. This was in preparation for the rod that we would be inserting into the back of the head. Once the papier maché had dried, we had to locate the eye line of the puppet and mark the point at the back of the head where we felt the eye line would be. We were each given a rod, we measured it and cut it according to the length we felt most comfortable with when holding the puppet’s head. Next, the lobotomy. We poked an opening hole with an ice pick and pushed the rod coated with glue as far into the puppet’s head as we possibly could. The lobotomy was successful. My puppet was coming to life slowly but surely. Now, moving on to the body.
The body


The construction of the puppet’s body went by in a flash. Having started with the technical drawings, you would now put in place the things you drew. It was a whirlwind of cutting, sawing, drilling, pasting, filing and hammering at pieces of wood and wire to put the puppet’s pieces together. At that point, I remember being worried that when I got home and, eventually, when time permitted, attempted to create a puppet of my own without help, I may never be able to recall all the steps I took.
But somehow, I believe that when I do, in due course, attempt to try, it might be a case of “riding a bicycle”. Seems impossible at the start but logic and muscle memory will kick in. What I’m trying to get at is, the shoulders need armholes (drill here!). The shoulders are connected to the spine (glue there!), the spine needs a metal hoop for you to control the puppet (drill, bend and insert metal wire!), the hips to the legs (connect here! Drill! Drill! Drill!) and so forth.
The crucial things we had to look out for were the joints (knees and ankles). The surfaces had to be smooth and have as little space between them as possible. An uneven surface between the knee joints would mean that the puppet wouldn’t be able to stand up properly, while being lightly supported by the puppeteer. Ankles had to be able to bend at an angle without too much interference from materials in between, because later on, we were going to add a thin layer of foam on top, and if the naked structure couldn’t bend properly, what would happen after adding the foam? Yes, logic indeed.
And though I may have meticulously jotted down the measurements, it really ends up being a case of how things will always change. What I thought appeared proportionate at the start, may look somewhat off-center at this stage. So adjust ahead. Ultimately I have to keep in mind that I’m making a puppet that I am going to work with so I have got to be as comfortable as I can be with it. And if it means that I have to abandon some parts of the initial plan, then I just have to do it. Change is the only constant. Which incidentally, was something Kian Sin said at the beginning of the workshop. And what he said is the truth. The process never stops. It never stops because we keep learning and as we keep learning, things change, we change.
DAY 3
Reflection on “My Other Self”

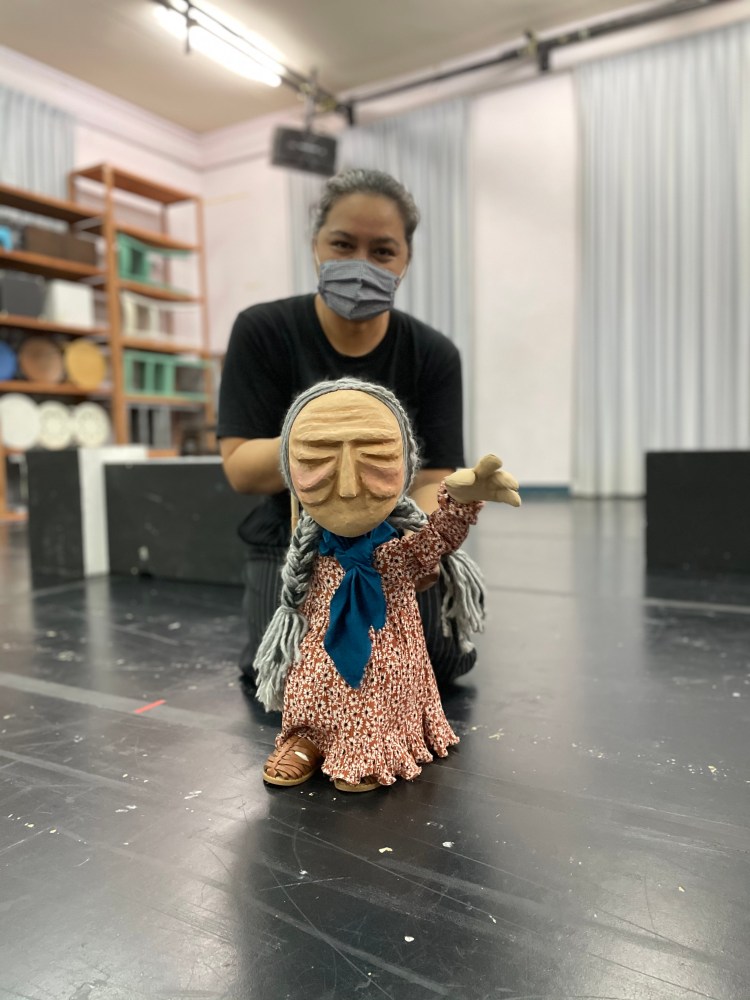
After reflecting on day 2, I came to realize that my Ah ma began to evolve. I felt somewhat disconnected from my first idea of my other self being an 80-year-old Chinese lady dressed in a samfu and working as a cleaner in a coffee shop. And though I hate to have to admit that yes, I most probably might end up working at Mcdonald’s in the future due to me choosing arts as a career, this Ah ma me just didn’t add up. I had to dig deeper. For those who may know me, you might remember that I used to work in the wardrobe department in the early years. And I am a firm believer that before you begin using a sewing machine, you’ve got to learn its name, which, if you listen hard enough, it will tell you. Only then, will the work ahead be smooth.
I believe, but I only speak for myself, that it was this very same way, that I learned my puppet’s name and character; Josephina Young, the 80-year-old lady who keeps to herself, doesn’t speak, but sees the ordinary come to life in her own magical way.
And with this new puppet name and characteristics, her outlook started to form inside my head.
Hands


Today, we started working on the puppet’s hands. We bent wires according to the shape. I went ahead without thinking much of it and ended up creating hands that didn’t have thumbs. Needless to say, I had to start again. The next step was to cut the foam according to the puppet’s hand size and slip the foam on the inside of the wire structure before gluing it shut, with the wire in between.
Working with foam


Next, we moved on to adding the “bulk” to the body. This part was one of my favourites. Because there weren’t very strict rules to it. You add the foam where you see fit. In other words, you improvise. As Josephina was an old lady who constantly walked with a hunch, I added a little more foam across her shoulder blades and back.
The arms were padded only up to the forearm, which was the lower half of the rod. Upper arm was a rolled up piece of foam glued together, with the string inserted through it. This same string would be connected to the shoulder where a hole was drilled earlier.
The feet

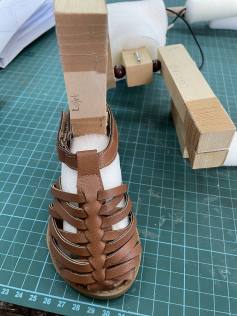
The feet were a little trickier. You had to make sure that it was thick enough to fill up the shoe and ensure that the foam doesn’t get in the way when the puppet kneels. The trick would be to shave off a little of the foam closer to the joints.
The neck


Inserting the “U” shaped wire which served as a neck joint, was similar to the earlier part of the construction when we inserted the rod into the head for the puppeteer to control the head movement.
To start, the wire was bent and knocked into a desired “U” shape and later coated and inserted into the head at the base. This neck joint would be later connected to the rest of the body with velcro. In doing so, it made maneuvering the head a lot easier.
Before inserting the wire, we had to mark out where we felt was the base of the head that meets the neck joint. I misjudged mine and luckily the mistake was quickly spotted by Kian Sin. The strange thing was, I thought I knew these things. I mean, I’m human, I was an acting student before and later on a professional performer. I learnt how to reprogramme my body after a slipped disc operation with long hours of movement classes, physiotherapy, Alexander technique, Feldenkrais classes, Yoga, you name it. How could I have not been more aware of the human body. I should have been more aware, but I wasn’t. Everything I thought I knew, I took for granted. Especially when I had to create a body from scratch, and help it move. I was re-learning with Josephina.
Thankfully, with Kian Sin’s help, I passed this stage and was ready for a little bit of a break. So we ended Day 3 with another round of paper maché, making sure to reinforce the area where the wires were.
DAY 4
The skin


Day 4 got us dressing the foam form with a layer of skin. Mainly my puppet in particular as I chose to stay close to the human form. First was creating the “skin”. This was another point where I stumbled. As Kian Sin explained, his puppet’s hands were made from calico cloth, which he dressed over the foam hands, hand-stitched and later on, painted with acrylic paint. I understood the steps, pictured them in my mind and was raring to go. Then Kian Sin threw a spanner in the works and suggested an alternative way, which was to use actual gloves, snip off the fingers, fit them around the puppets fingers and later hand stitch them onto the hands. I crumbled. I couldn’t picture the alternative solution. I couldn’t accept change. And the funny thing was, this was my first time making a rod puppet! I should have been able to accept this alternative step and move forward. But for some odd reason, I couldn’t and I wouldn’t. I would like to lie to you at this point that I just liked the first step but no, that’s not the truth. The truth was, my pride stood in the way. I wanted to do exactly what Jian Song had done years ago when he made that particular puppet he showed us. Some long suffering tortured artist in me would rather die using the original method of the masters than to accept that change was inevitable and change was sometimes beneficial. Kian Sin, being the kind and patient teacher he was, allowed me to try and after an hour of struggling, I succumbed and admitted I was wrong. To which he replied, “You tried, you made the mistakes, and then you learn from them. That’s more important.” I felt like I was back in acting school all over again. And it felt wonderful.
Costumes


After the hands, we moved on to things in more familiar territory. Sewing. I fitted the stockings, adjusted them according to Josephina’s size with allowance for joint movement. I altered my daughter’s old dress to fit Josephina. I like the patterns on the dress. It gave that little “quirk” I needed for my puppet.
The last step for the day was nailing the shoes to the puppet’s feet. I had to drill a small hole at the sole and hammer a nail. This ensured that the shoes were firmly stuck to the puppet and it made a huge difference when I tried handling my puppet after that. “Walking” the puppet was so much easier and it also gave me peace of mind that her shoes wouldn’t fly off at any time during a performance.
I loved how it was all coming together.
DAY 5
Aesthetics


The final day. It was going to be the day we put everything together; it was all about the aesthetics. I started by mixing acrylic paints for Josephina’s skin colour. Painting on her face was almost as hard as the very first step of carving the head from a block of styrofoam. I had to keep in mind that my puppet was built for a stage performance and harsh theatre lighting would wash out the features especially if I kept it too minimal. Besides painting the puppet’s face, I had to also paint her hands. This was fairly easy. I just had to be careful not to miss painting the spaces between fingers and creases.
The hair was the next challenge. I chose to use a variety of yarn of different textures and colours which were to be glued on strand by strand. This took a while but once I found the rhythm, it felt like a dance. The only drawback about using yarn was, the fibres get stuck to rough surfaces, especially velcro which creates a messy fluff and may need addressing in the long run. Otherwise, yarn really gives Josephina’s hair the look I wanted to achieve. Once this was done, it was time for Josephina’s first haircut. I fancied her hair long to the ground, it gave her this crazy old lady edge which I thought was pretty cool, but I had to be practical. The long hair would definitely get in the way of me maneuvering her. So, haircut it was.
Next, I cut and sewed the edges of her scarf which I had to also pin and glue to her head. The scarf was added to cover the neck joint with connecting velcro, which was exposed.
Last but not least, an overall check and touch up before the show.

Back to the studio
Like how we began this masterclass, we ended it the very same way. The only difference this time was, we were working with our very own puppets. It felt very different. I didn’t feel as alone as I felt before. I had a friend with me for this little performance. I had Josephina and she had me. The puppets were asked to introduce themselves. Unfortunately for Josephina, I decided from the beginning, that one of the main characteristics about her was that she couldn’t speak. She would express herself through her body language. If you ask me why I decided to do something like that for my puppet, I would tell you that I don’t have any good answers and I haven’t fully addressed this within myself yet. To help you understand why I say this, would be to take you back to the first moments when I first had the opportunity to handle a puppet. Movements, walking, breathing, were to me, something I could learn to pick up quickly. To me, the worst part was giving the puppet a voice. The moment I opened my mouth and heard the voice, my voice, coming through, I felt completely disconnected from the puppet I was working with. Perhaps this is something that must be learned over time. And it is also something that says a lot about myself as a performer. I am still learning to let go.
In conclusion, the Rod Puppet Construction Masterclass is not just about learning how to construct a puppet and work with the puppet on stage, it is about self-discovery. As a performer, I unpacked so many issues that I thought I had dealt with long ago. It only goes to show that you can never stop learning about yourself. And you can learn even more about yourself as an actor when working with a puppet, which, while writing these last few words, I have discovered, is my other self.
Thank you Kian Sin, Auderia, my classmates and The Finger Players for this wonderful experience.
Thank you for reading!
This piece was written by Joanne Ng, theatre performer turned arts manager turned non-essential pandemic survivor. For years, she has had a strong interest in puppetry; the construction and mechanics, the actor’s form and surrender to the host, and most importantly, the magic that makes the audience believe. It was also years that she never got anywhere near a puppet. Watching from afar saddened her. It wasn’t enough. She is truly thankful to The Finger Players for opening their doors and offering this amazing learning opportunity.
The Finger Players organises puppetry workshops for all ages throughout the year. To know when we organise our next puppetry workshop, follow us @fingerplayers on Instagram or Facebook, or subscribe to our mailing list below.
We would love to hear from you! Write in to us at admin@fingerplayers.com.